This technical article is designed to give value to the reader through more knowledge on the benefit of monitoring shcok absorber temperatures.
There is a great article by Matt Raudonics on a trek through the Canning Stock Route with a fleet of Mercedes G Wagons.
“Mercedes Benz had become the first vehicle manufacturer to take a convoy of standard vehicles up the 1600km of the Canning Stock Route, one of the harshest tracks in the country. There had been trials, tribulations and added expenses but all seven vehicles had made it on schedule.
The total damage toll ran to five tyres, four cracked wheel carriers, one rear view mirror knocked off and a few more damaged, two G 350s with non-operative airconditioning, two AdBlue tanks breaking their mounts, 10 shock absorbers and a cracked radiator hose from a reversing incident. “
The number that jumps off the page is “10 shock absorbers”.
When travelling over corrugations and difficult road/track terrain, significant energy is generatedin the shock absorbers and tyres. This increases the temperature of the tyres and shock absorbers.
The tyres and shock absorbers dissipate the heat. However, if more heat is being created than the tyres/ shock absorbers can dissipate, the oil in the shock absorber will over-heat causing the shock absorber to fail.
If the tyre sidewalls are generating too much heat, they can be vulnerable to failure too.
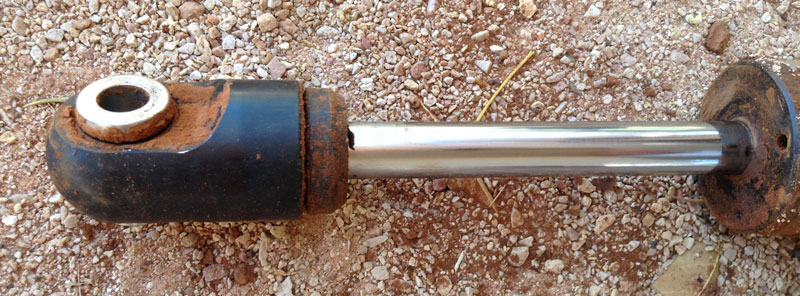
Over corrugations, the distance the shock absorber travels is very little. So the heat build up is concentrated. See the photo below of the “blue heat ring” on the shaft of the shock absorber caused by extreme temperature build up.
The design of the shock absorber is to efficiently dissipate this heat. If the heat build up is greater than the rate that the heat can dissipate, the shock absorber increases in temperature. If the temperature goes above 170C, even high temperature seals like “Viton®” will fail, the oil/nitrogen will dissipate, and the shock absorbers fail.
The simple way to prevent this is to monitor shock absorber temperature.
Monitoring Shock Absorbers:
Stainless Steel Temperature Sensor rated at 220 degrees+
Add Temperature Monitoring Module to SIMARINE Pico system
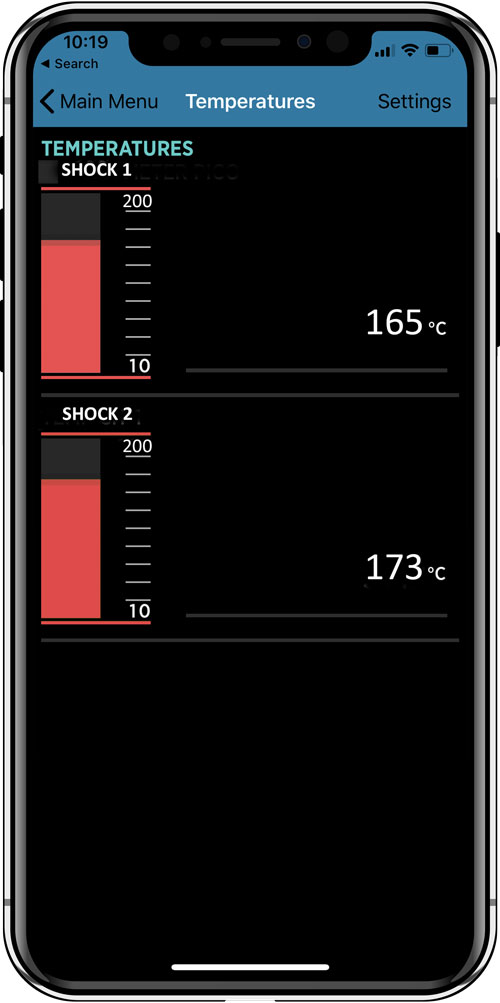
Load the SIMARINE App on your Smartphone
Set the alarm points!
Stainless Steel Temperature Sensor rated at 220 degrees+
Have to be stainless steel,
Connected with stainless steel braid. Avoid any rubber as this will just melt and potentially cause a fire.
The sensor will be facing down with the entrance to the stainless steel head “open”. So, the Sensor needs to be long so that the seal can be waterproof.
The sensor is clamped twice around the shock with pipe clamp ring.
Adding Temperature points to SIMARINE Pico System
Use the T107 Module or the SCQ25t. Both of these take 4 temperature inputs.
See modules below.
Set temperature Alarm points to SIMARINE Pico System
Check seal type and temperature limit
Use 20 degrees below this to a max of 140C to start with.
Do a simple calibration test of ambient temperature on a typical day forst thing in the morning.
SIMARINE has calibration and temperature adjustment.
This technical article is designed to give value to the reader through more knowledge on alarm management.
Firstly, there are 3 different types of ALARMS:
Those that signal a “pre-condition”; to give you time to control the situation.
Those that signal a problem to react to!
Those that signal a “healthy” condition; to allow change in operation.
Here are examples:
1. Battery “Pre-condition” ALARMS:
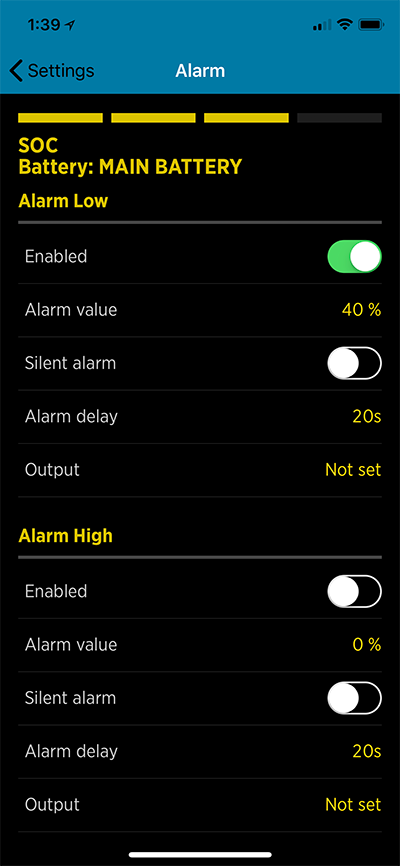
“State of Charge” (SOC) ALARM
This ALARM sets the State Of Charge (SOC) level that will trigger an ALARM. For AGM Batteries, setting this at say 60% will give you time to adjust battery usage before you reach the 50% Depth of Discharge level.
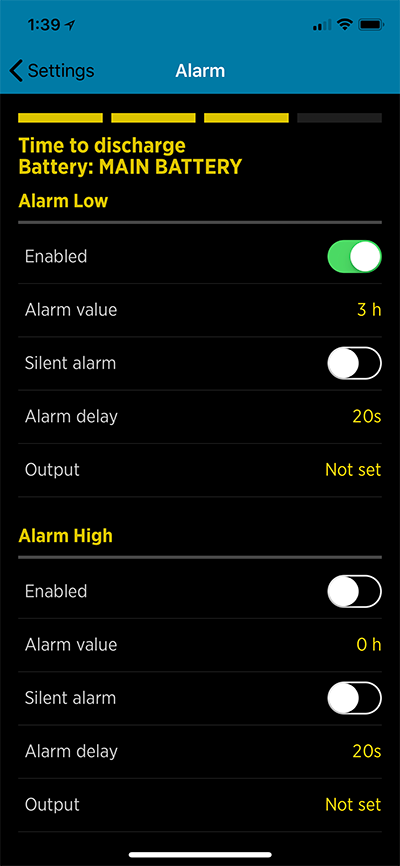
“Time to Go” TTG ALARM
This ALARM sets the Time to Discharge or Time to Go (TTG) hours that will trigger and ALARM. For your lifestyle, setting this at say 4 hours will give you time to adjust battery usage before you reach the critical voltage level of 20% SOC.
This type of alarm is really a “HEALTHY” Alert to you.
2. Battery ALARMS:
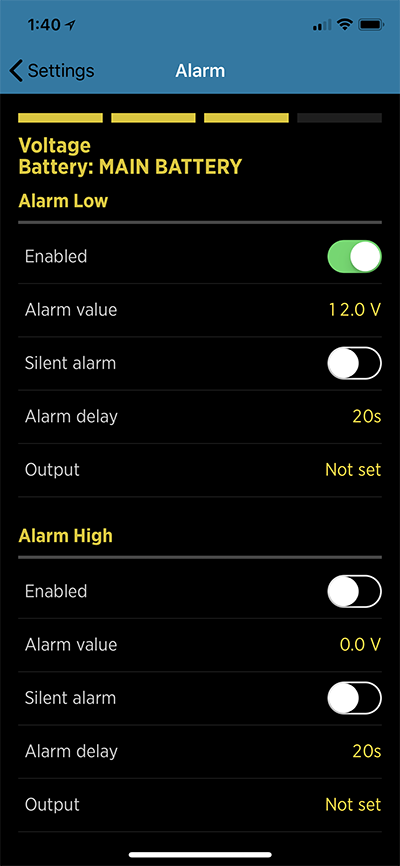
“Battery Voltage” ALARM
This ALARM sets the Voltage level that will trigger an ALARM. For AGM Batteries, if there is a major current draw from an inverter, the voltage can drop while the inverter is operating and then bounce back once it is off. Setting a control condition to turn the battery supply off based on battery voltage can be unwise in this situation. For this reason there is a “delay” that can be set in case the battery voltage recovers after a low condition. However, in the end this is the condition to let you know that your battery condition is critical.
2. HEALTHY ALARMS:
“ALARM HIGH” on SOC and TIME to GO
If you are charging your battery with a generator, it can be very helpfull to know when your batteries are full or nearly full. By setting the ALARM HIGH on the State of Charge to say 95% or even 100%, you can get an alert when this is reached.
This is more helpfull and reliable than the Battery Voltage. There is no guarantee based on the battery voltage alone that the batteries are fully charge. This is even more important with Lithium batteries.
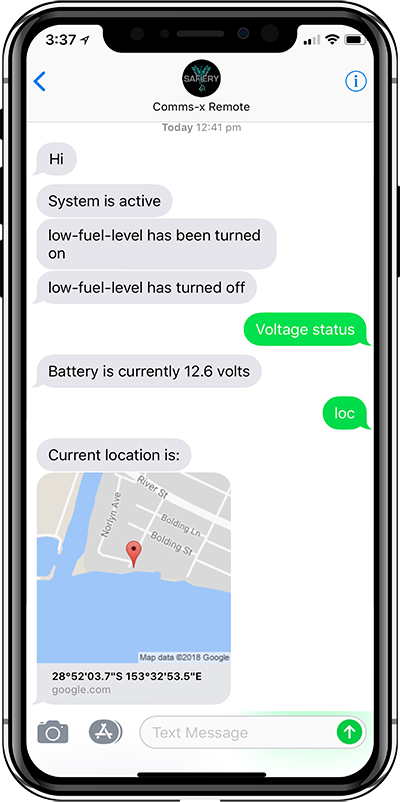
GEO-FENCING and REMOTE MONITORING
The other type of Pre-condition Alarm can be generated using “geo-fencing” on a GPS connected COMMS-X device.
This device will also monitor your battery healthy, your geo-position and another alarm input like “AC Power has dropped out” or “intruder alarm”. This means that if you have your RV in Storage or your boat on shore power at a marine, you can monitor these events.