Posted on

SOLAR TEST REPORT

SOLAR TEST REPORT

SAFIERY UNIVERSITY

SOLAR PANEL TEST PROCESS AND TEST REPORT FOR TRIPPLE INSULATED SOLAR PANELS

This technical article is designed to give value to the reader through more knowledge on Lightweight Flexible Solar Panels.   Click on the image to download the test report.

Principles of Testing
1. SOLAR PANEL DESIGN

The solar panel operates at optimum performance with MPPT solar controller.

The MPPT Solar Controller is vital to the performance of the solar panels. This controller takes the solar panel power (voltage and current) and converts it to the optimum mix to charge the battery. It effectively works as a battery charger and not a power supply. It takes about 15 minutes for most MPPT controllers to find the “maximum poer point”.

Solar panels can be combined in series so the positive of one panel feeds the negative of the second panel. You will then get a combined panel voltage of 48-52V in good sun.

It is wise to do parallel connections first and then a series connection. The reason being that is one panel drops out with a leaf or shade coverage, then the series connection set will drop in voltage and the optimizer will block this set out. If the panels are in parallel first and then in series, if one panel is out from leaves or shade, the system will contune at best performance.

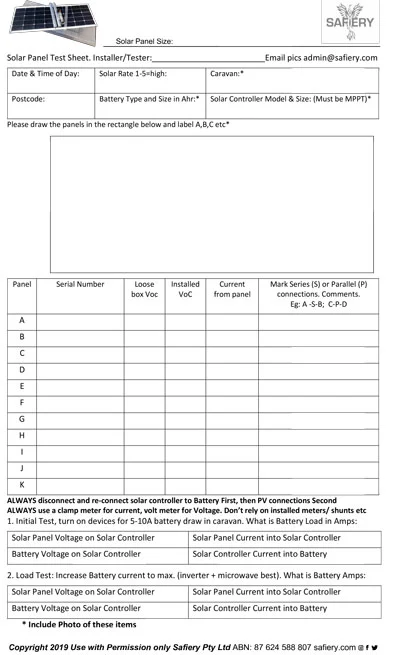
Draw the solar panels on the report and connect in parallel and/or series as it is wired up with simple connection lines. We suggest you do this right at the beginning of the installation to be sure as to how you plan to wire the panels.

2. SOLAR CONTROLLER

CHECK that the solar controller can accept a high panel voltage over 50V. Some well known brands like Enerdrive cant accept higher voltages. if you need to replace the solar controller, then EPever Tracer 30A or 40A is excellent BUT you have to program these for Lithium Batteries for best performance.

The best Solar controllers for Lithium Batteries have a “boost function”. This means that if it is late afternoon and the batteries are in “float charge” mode and then is cloud cover for 10-15 mins, upon return of the sun, the solar controller will go into a “boost mode” of bulk charge for a programed period of time. This gives the batteris a real boost in capacity before nightfall. the EPEver controller has this feature as do many others.

3. SOLAR PANEL TESTING

Voc is the open cicuit panel voltage. This varies based on the solar irradiance and the panel design. Taking this reading in the solar conditions in which you are ytesting, gives us a feel for the irradiance on the day. It also confirms all the panels are consistent and meet the quality checks.

After installation, reset the solar controller by disconnection both the battery connection (generally pull the fuse) and the Panel connection (they have been disconnected anyway). Always connect the battery to the solar controller first, wait a minute then connect the solar panel wires. This is to allow the microprocessor of the solar controller to boot up and establish the battery voltage. 

Measure the panel voltage and the current for each of the solar panel cables coming to the solar controller. If they are joined in the roof or overhead cupboard, then measure this at that point and complete the report. This is a very important step. The current you are measuring is NOT the battery current from the solar controller but the panel to controller current. it will ALWAYS be less than the solar controller to battery current.

4. INITIAL SYSTEM TESTING

This is with all the panels connected. You need to know the battery voltage as if this is high, the charge acceptance rate may be low depending on the battery type. (specially trus for AGM, not so for Lithium). The solar controller should boot up and operate in “bulk charge” mode for about 90 mins or more if the battery State of Charge is low. This is the condition we want to test in. So it is important to get the controller in “bulk charge mode”. Turn on some loads to get 5-10A coming out of battery and then complete the recording of panel and battery voltage and current AT THE SOLAR CONTROLLER.

5. UNDER LOAD SYSTEM TESTING

This is with all the panels connected and the battery under maximum load. The best way to achieve this with Lithium batteries is to use the inverter if it is fitted and operate the microwave with a litre of water inside and set to boil. On most caravans, the current draw will be 110-140A. If the batteries are AGM, then set the microwave down to a lower setting and draw a max of 40A.   The solar controller should still be in “bulk charge” mode so do this quickly after the first test. If it isnt, reset the solar controller by disconnecting the panel voltage and then the battery voltage as described before. Then complete the recording of panel and battery voltage and current AT THE SOLAR CONTROLLER.

6. CUSTOMER HANDOVER

Offer to step through the report with the customer. Have photographs of the current and voltage values if the customer is collecting at a later time and cant see the actual test results.
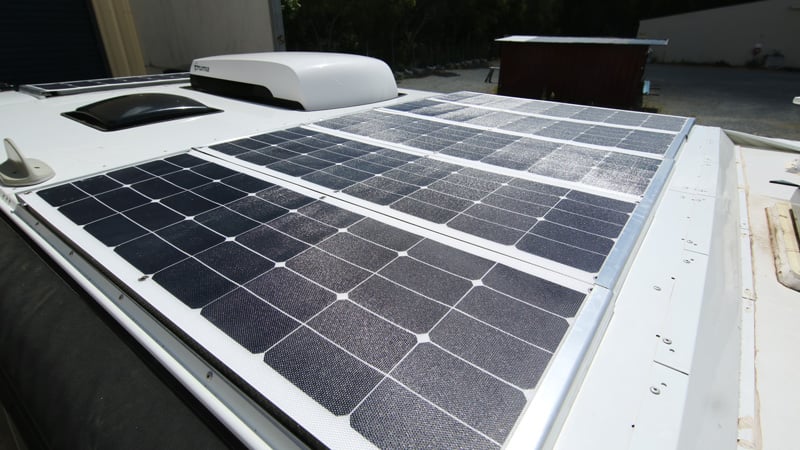
Installation if buying an iKamper Kit from Drifta

These are ordered directly from Drifta who prepared and bond the kits specially for iKamper.

Keep the ends of the solar panel cabling dry and insulated while installing as they will have some voltage. It is best to do the installation under cover or in the shade. Before connecting the solar panels to the solar controller, cover the panels to reduce the solar output. The power from the panels in this state is very small and presents no danger to the DIY installer.

Drifta rout out the polycarbonate underneath to match the profile of the iKamper. You MUST specify the model as there are 2 profile shapes.

They ship the pre-assembled solar kit to you.

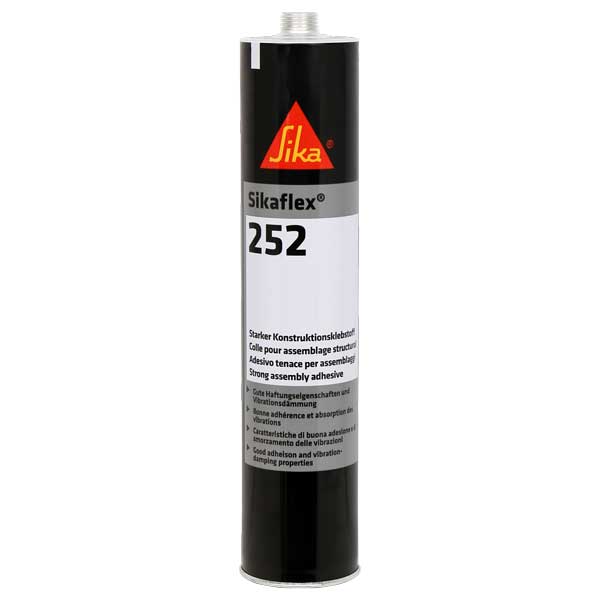
You (or your installer) would then place on iKamper as a dry fit to ensure the profile is good. If good then proceed to install on iKamper with just the Sikaflex252. Remember that weights are need to keep pressure on the Solar panel kits as the SikaFlex252 bonds for a 24 hour period.

Wait at least 48 hours after curing before travelling at speed.

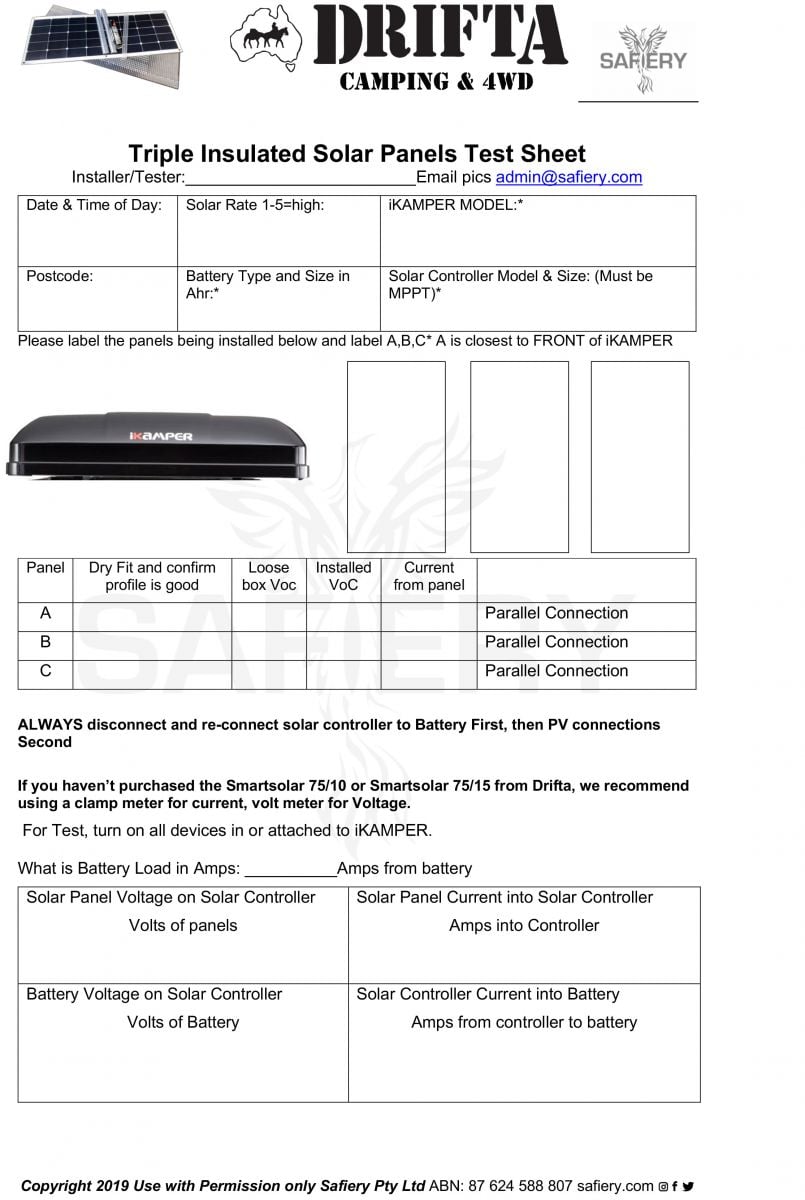
Download the iKAMPER test Sheet by clicking on test sheet image:
Posted on

INSTALING TRIPLE INSULATED SOLAR PANELS

INSTALING TRIPLE INSULATED SOLAR PANELS

SAFIERY UNIVERSITY

LIGHTWEIGHT SOLAR PANEL INSTALLATION OF TRIPPLE INSULATED SOLAR PANELS INSTALLATION OF iKAMPER KITS PURCHASED FROM DIFTA

This technical article is designed to give value to the reader through more knowledge on Lightweight Flexible Solar Panels.

Principles of Design

1. INSULATION OF SOLAR FROM CARAVAN ROOF

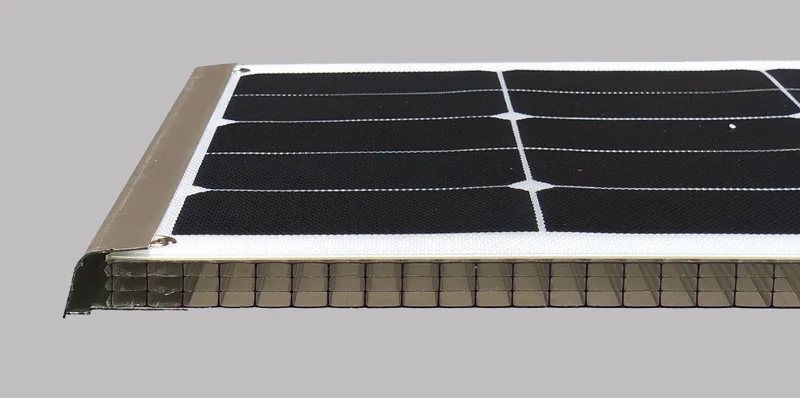
Using a Triple Insulated UV rated Polycarbonate sucessfully separates expansion and contraction of the caravan roof from the solar panel.

Plus it has these benefits: The triple insulation promotes air-flow between the layers cooling the solar panel AND the caravan roof. The inside temperature of the caravan will reduce as the Polycarbonate has an “R” factor of 3. This means it transmits one third of the heat energy through to the caravans inside space.

The polycarbonate is attached to the solar panel with two simple runs of Sika 252 and additional placement to secure the end caps. The solar panel can expand and flex comfortably.

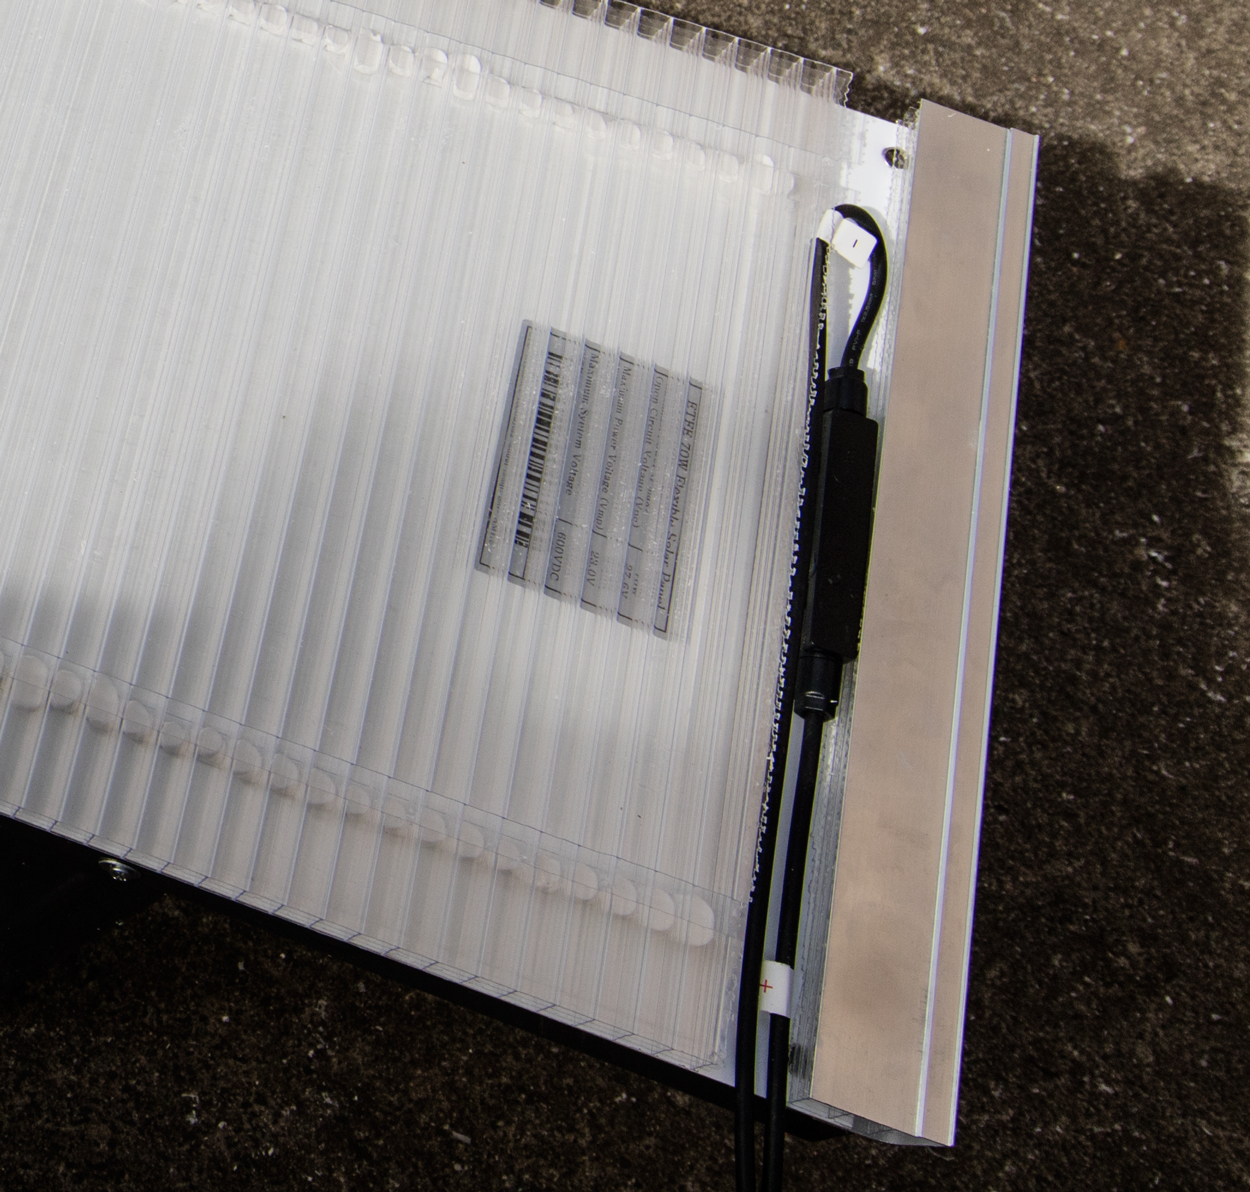
2. SOLAR PANEL CONNECTOR/OPTIMIZER CONCEALED UNDER PANEL

Having the optimizer installed under the panel and concealed has the major benefit of reducing damage from overhead tree braches running accross the top.

It also allows for the inter-panel cabling to pass through the cavity containing the optimizer so adjacent panels can have their cabling concealed on the roof.

3. EXTRUDED ALLOY PROTECTION CAPS

We designed and developed this extrusion specifically to:

  • Cap the front and rear leading edges for general protection.
  • Have a 3mm recess so that the new panel can be placed ontop of a failed panel without disturbing the roof.  This is carefulled designed to exactly cover the 55W panels in a Kimberley Kruiser of Kimberley Karavan.

In the photo above, you can also see the Sika penetrating one layer of the “triple insulation” and bonding to the underside of the panel.

RESULTS:

  • Excellent performance with less temperature rise than glass panels
  • Excellent bonding yet with flexibility
  • No exposure to damage from overhead tree branches.
  • Cooler inside the caravan

Installation if buying an iKamper Kit from Drifta

These are ordered directly from Drifta who prepared and bond the kits specially for iKamper.

Keep the ends of the solar panel cabling dry and insulated while installing as they will have some voltage. It is best to do the installation under cover or in the shade. Before connecting the solar panels to the solar controller, cover the panels to reduce the solar output. The power from the panels in this state is very small and presents no danger to the DIY installer.

Drifta rout out the polycarbonate underneath to match the profile of the iKamper. You MUST specify the model as there are 2 profile shapes.

They ship the pre-assembled solar kit to you.

You (or your installer) would then place on iKamper as a dry fit to ensure the profile is good. If good then proceed to install on iKamper with just the Sikaflex252. Remember that weights are need to keep pressure on the Solar panel kits as the SikaFlex252 bonds for a 24 hour period.

Wait at least 48 hours after curing before travelling at speed.

Download the iKAMPER test Sheet by clicking on test sheet image:

Instalation of unassembled kits purchased from Safiery:

Keep the ends of the solar panel cabling dry and insulated while installing as they will have some voltage. It is best to do the installation under cover or in the shade. Before connecting the solar panels to the solar controller, cover the panels to reduce the solar output. The power from the panels in this state is very small and presents no danger to the DIY installer.

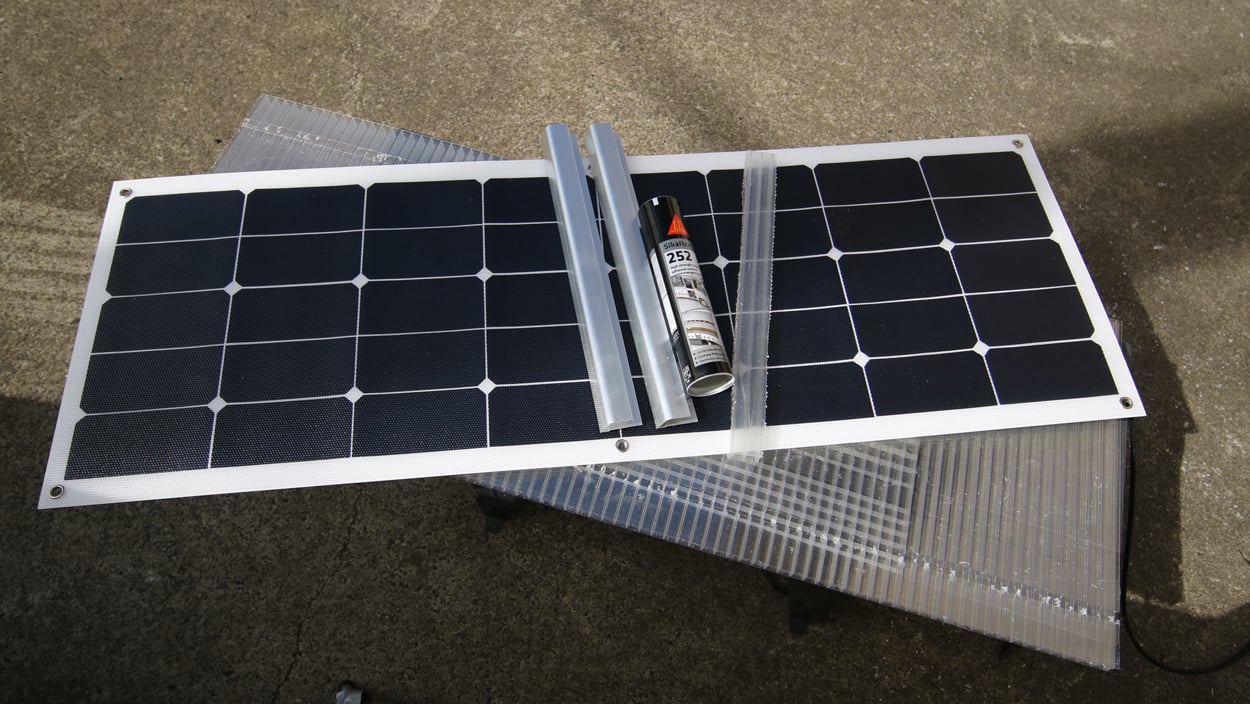
These parts, but NOT the Sika are suppled for each solar panel:

You will need Sika 252. DONT USE ANY OTHER SIKA PRODUCT. IT MUST BE SIKAFLEX 252.

Here is a link to Bunnings: https://www.bunnings.com.au/sika-300ml-white-sikaflex-252-polyurethane-adhesive_p1213763 

It is available in White or Black.

The new polycarbonate will be available only in black. However, either colour can be used as the Sika can be contained inside the solar panel assembly.

Here is the video on the assembly:

For fixing to the caravan roof, follow the same process of running the Sika down the routed strips and under the front and leading edges.

It is important to:

  • Adhere the UV Rated surface facing the Solar Panel in the direction of the solar panel (facing up). There will either be a “UV Protection marked film” or a “White Strip of Tape” to designate this surface.
  • Do not cover the solar cells with the protection strips. Leave at lease 2-3mm clear.
  • Test the instalation and register for warranty. The test sheet can be downloaded here.
Posted on

BatteryPlus 35 PM suits Safiery Lithium Battery

BatteryPlus 35 PM suits Safiery Lithium Battery

SAFIERY UNIVERSITY

LITHIUM BATTERIES COMPATIBLE BATTERY PLUS 35

This technical article is designed to give value to the reader through more knowledge on the compatibility of Setec’s Battery Plus 35 Charger/Controller and Safiery 125Ahr Lithium Batteries.

If you have one of these controllers/ chargers, here is the good news:

Safiery 125Ahr Bluetooth Lithium batteries are compatible.

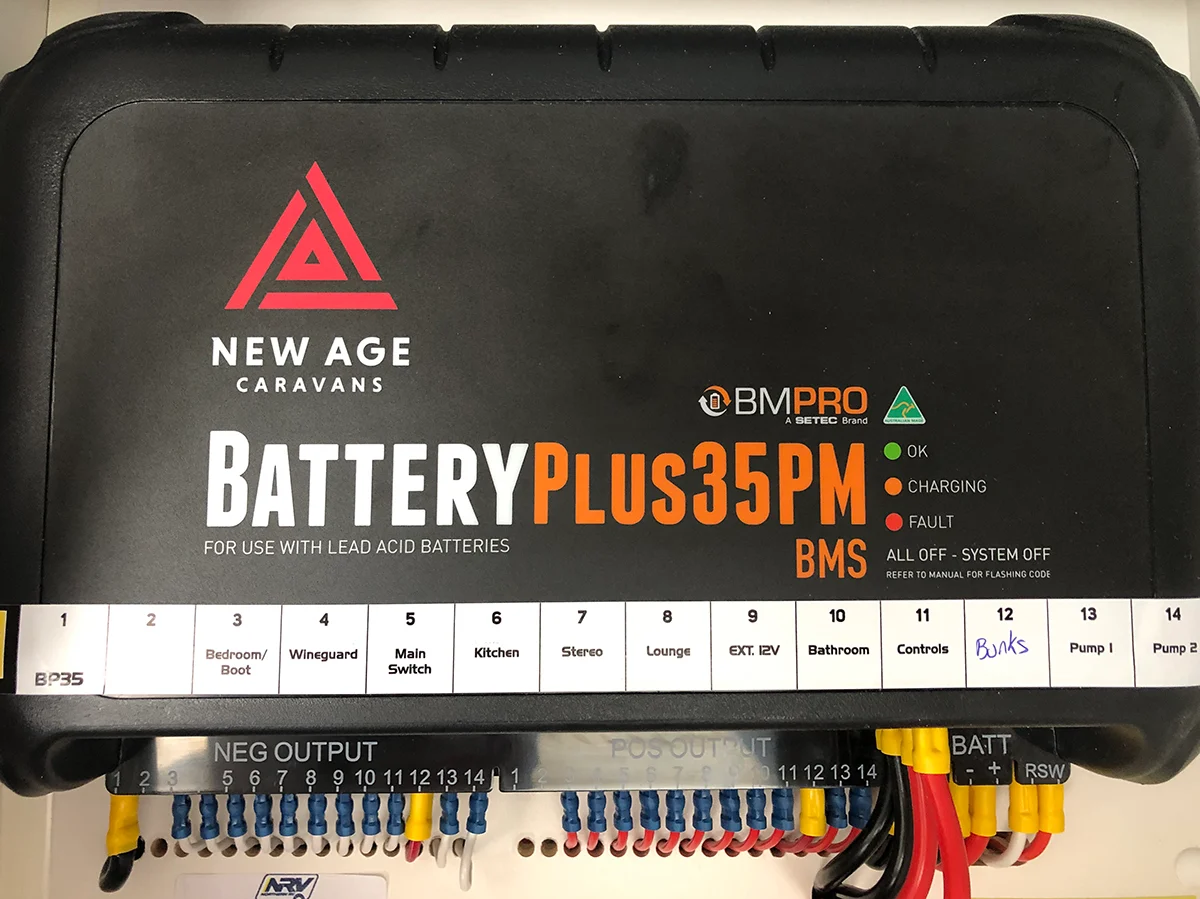
Even though the label says “for lead acid chemistry”, it is completely compatible with Safiery 125Ahr Bluetooth Lithium.

Here is why:

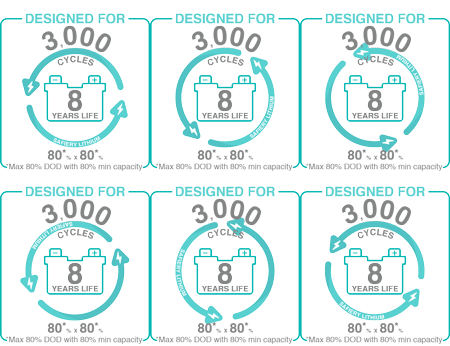
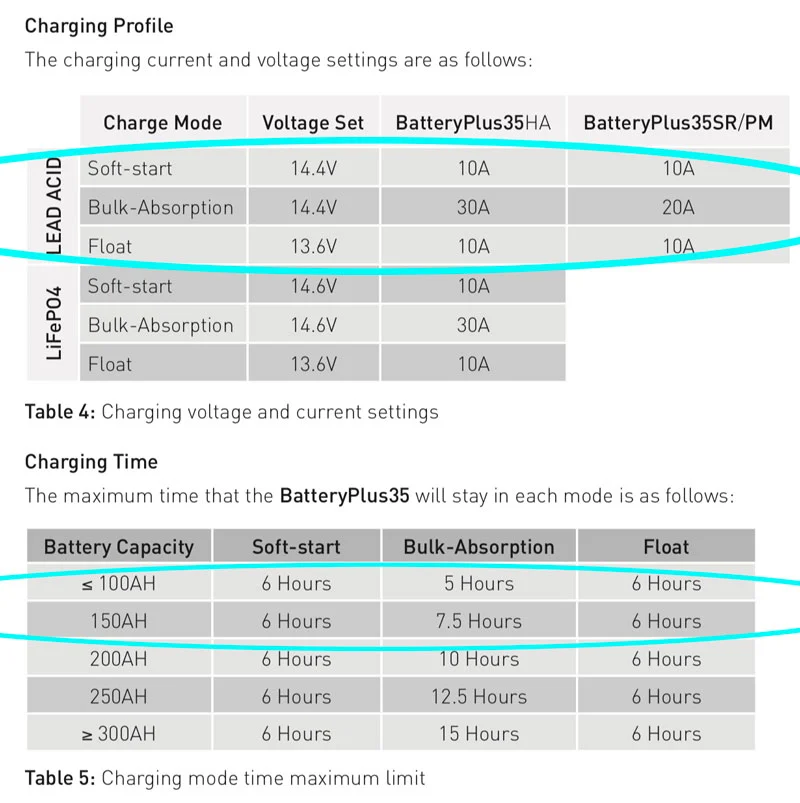
The Charging profile for “lead acid” is set at 14.4V and 13.6V. This is perfect. In fact the “lithium setting ” that they publish is too high for most Lithium batteries and if you have a controller set to Lithium, we would highly recommend setting it to Lead acid.3000 cycle and 8 year design life lithium battery

The Bulk and absortion charge times are good.

Completing a health test after you install SAFIERY LITHIUM batteries with this controller:

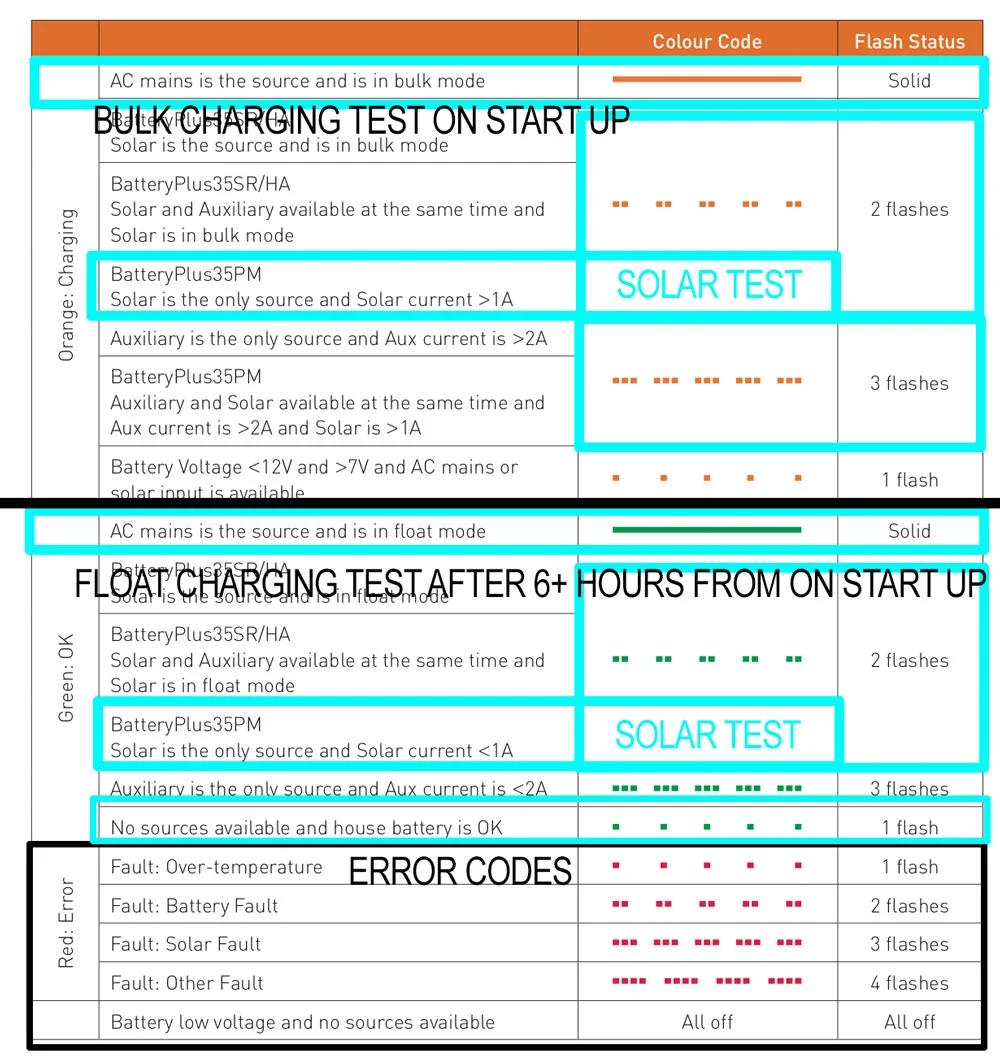
  1. Startup test after replacing battery should look like “Bulk Charging on Start up”
  2. After 6-8 hours the display may look like: “Float charging Test” below
  3. Error codes are shown.   
Posted on

REDARC BMS INTEGRATION

REDARC BMS INTEGRATION

SAFIERY UNIVERSITY

EASY INTEGRATION REDARC 1230S2BMS

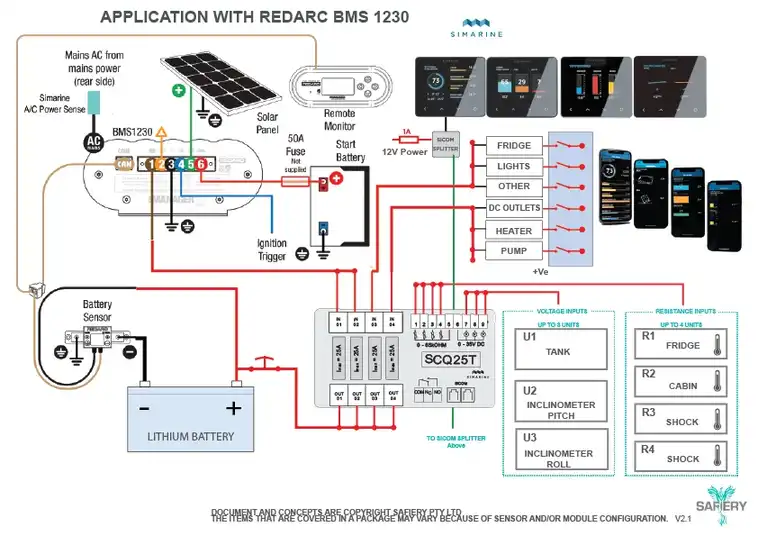
This technical article is designed to give value to the reader knowledge on integrating the REDARC BMS with both the Triple Insulated Solar and Simarine Monitoring System.

Redarc is a respected brand in the vehicle power products. Their 1230S2 BMS makes easy integration of:

  • 240V Battery Charger
  • Solar Charger
  • DC to DC Charger from vehicel
  • With starter battery support

What You can get with the integration:

BMS1230S2 Displays

Monochrome LED Display

SAFIERY Integration can add

Gorilla Glass, Retina quality

No Smartphone App

Smartphone App Included

Solar PV Voltage

X

DC to DC Vehicle Voltage

X

AC Power Voltage

X

Battery Voltage

X

X (On Smartphone as well)

Solar or DC to DC Power

X

X ​(On Smartphone as well)

Time to Go  and SOC Alarm

TTG

X ​(On Smartphone as well)

Individual Fridge Power

X ​(On Smartphone as well)

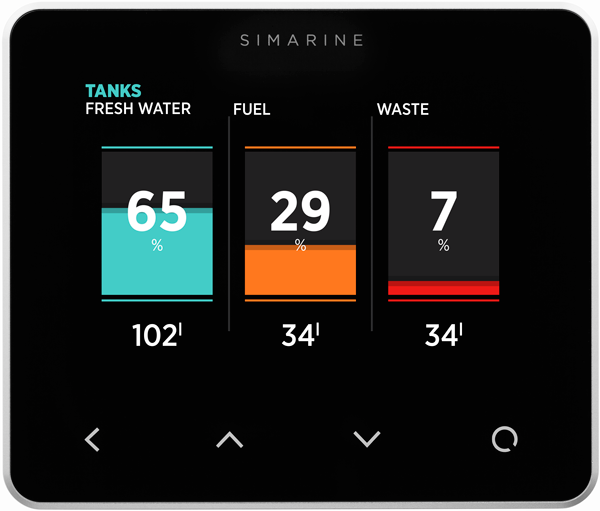
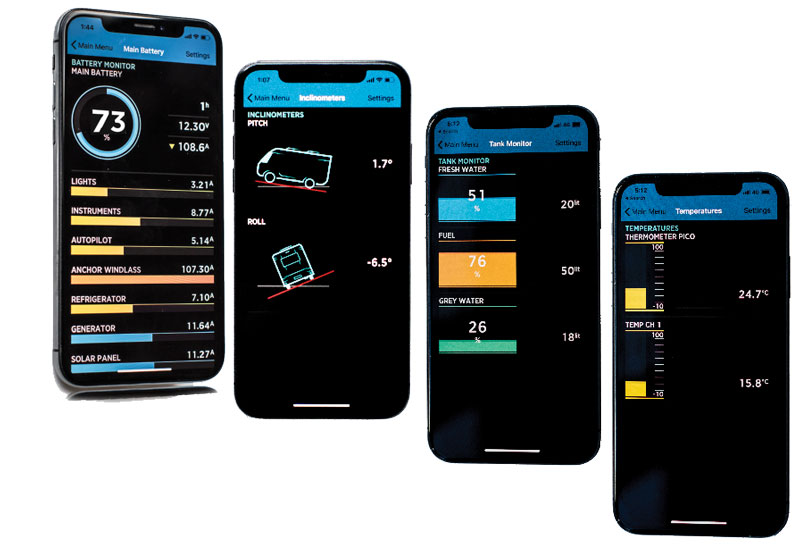
Tank (Fresh, Grey) Levels

X (up to 12) ​(On Smartphone as well)

Temperatures (fridge etc)

X (up to 14) ​(On Smartphone as well)

Pitch and Roll Angle

X Both ​(On Smartphone as well)

LPG Bottle Capacity

X Up to 2 ​(On Smartphone as well)

BMS1230S2 Specification

Safiery Comment
AC Input Voltage Range (nominal)   220-240VAC50Hz
Power Rating Good   520W
Efficiency   80% – 90%
Connection   IEC MainsPlug
DC Input    
DC Input Voltage Range Good   9 – 32V
Turn ON/OFF Threshold 12V(24V) Good   13.2V/12.7V (26.4V/25.4V)
Power Rating Good   520W
Efficiency   94%
Connection   Phoenix 1967498Connector
Solar Input    
PV Input Voltage Good   9 – 32V
PV Turn ON (OC Voltage) Good   17.5V
Power Rating Good   520W
Efficiency   93%
Connection   Phoenix 1967498 Connector
Max Volts @ Bat (25°C Nominal)    
  Touring Mode    Float
Gel Setting Good 14.4V 13.5V
AGM Setting Good 14.4V 13.5V
Calcium Setting Good 15.2V 13.5V
Standard Lead Acid Setting Good 14.8V 13.5V
Lithium Setting Touring Mode and Float Mode Good. Recommend different plan for storage at 40-60% SOC. 14.5V 13.6V
Output Current (Nominal) Good   30A
Temperature Compensation    
Standard Lead Acid AGM, Gel or Ca Good   +30mV / °C < 25°C < -30mV /°C
Lithium Setting Good   40°C < 0.5%/°C <60°C
Operating Temperature*   -40°C – 80°C
Over Temperature Shutdown Good   Yes
Total Battery Capacity Good   40 – 800Ah
Output Battery Volts (Nominal)   12V
Output Battery Volts (Minimum) Good   4V
Max Current on Load Disconnect   1A
Memory Save on Battery Disconnect Good   Yes
Output Protection    
Short Circuit Protection Good   Yes
Surge Protection Good   Yes
Reverse Polarity Protection Good   Yes
Overload Protection Good   Yes

BMS1230S2 Wiring to Simarine

Posted on

HIGHEST EFFICIENCY RV SOLAR

HIGHEST EFFICIENCY RV SOLAR

SAFIERY UNIVERSITY

HIGHEST EFFICIENCY SOLAR PANELS ON RV’s

This technical article is designed to give value to the reader knowledge on the Efficiency of Triple Insulated Flexible Solar Panels.

Solar Panel Efficiency is strictly speaking the measure of converting the sun’s irradiance into electrical energy. However, RV’s have limited roof space. So we will add into this equation the electrical energy available per square metter of RV roof space at typical mid-day temperatures in Australia.

Efficiency is impacted by:

  • Efficiency of the Silicon Cells;
  • Design of the Silicon Cells transmitting the collected energy;
  • Temperature of the Silicon Cells;
  • Dust and debris on Silicon cells.

The Solar controller is excluded from this assessment. It is a topic by itself.

The orientation of the solar panels to the incidence angle of the sun is also excluded. This is a factor regardless of solar panel efficiency on electrical output.

Silicon Cell Design and Efficiency: the top 5 Manufacturers in 2019

Here are the top five best solar panel manufacturers in 2019 ranked based on the highest efficiency solar panel they have to offer:

  1. SunPower (22.2%)
  2. LG (21.1%)
  3. Solartech Universal (20.2%)
  4. Silfab (20.0%)
  5. Solaria (19.4%)

The most efficient solar panels on the market today have efficiency ratings as high as 22.2%, whereas the majority of panels range from 15% to 17% efficiency rating. SunPower panels are known for being the most efficient solar panel brand available on the market. Though they will come with a higher price tag, SunPower will often be the consumer favourite for anyone concerned with efficiency as a primal metric of interest.

Safiery uses only SUNPOWER Silicon Cells. We use their Ultra High Performance Maxeon Gen III

Temperature Effect and Efficiency: the bigest killer to performance:


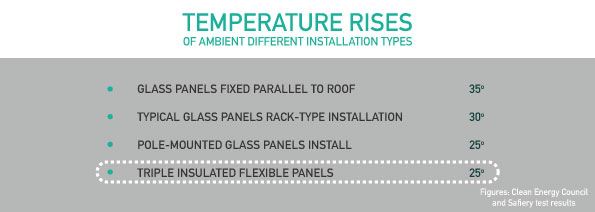
Glass Solar Panels have a typical 35C temperature rise above ambient in full sun.


EFFICIENCY IMPACT OF TEMPERATURE

Each manufacturer solar panel has a rated temperature impact in efficiency.

  • Glass panels are typically quoted at 0.3% to 0.4%.
  • Glass panels rise typically approx 35 deg C above ambient.
  • Glass panel drop in efficiency because of temperature is:
    (35C +Ambient (28C say)-25C (std)) x 0.35% = 13.3% reduction.

 Triple Insulated Panels are:

  • Safiery Triple Insulated Panels have a temperature co-efficient of 0.3%
  • Safiery Triple Insulated Panels rise by only 25 deg C above ambient.
  • Safiery Triple Insulated Panels drop in efficiency because of temperature is:
    (25C +Ambient (28C say)-25C (std)) x 0.3% = 8.4% reduction.

This is nearly a 5% improvement in efficiency over Glass panels.

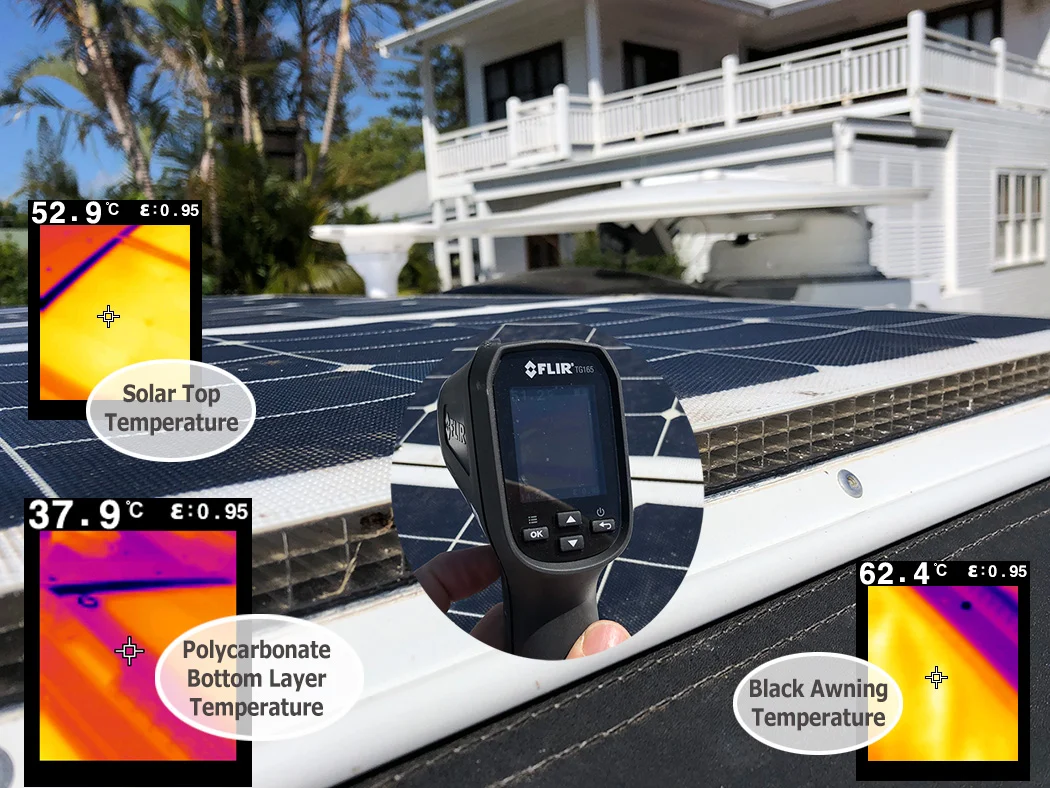
Here are photographs of real live test results:

1. HOW TRIPLE INSULATION IS ACHIEVED ON CARAVAN ROOF

There are three layers of cells that comprise the UV rated Polycarbonate material. The triple insulation promotes air-flow between the layers cooling the solar panel AND the caravan roof. The inside temperature of the caravan will reduce as the Polycarbonate has an “R” factor of 3. This means it transmits one third of the heat energy through to the caravans inside space. 

The “Black” polycarbonate pulls heat from the back of the solar panel and dissipates it to the open air.

The polycarbonate is attached to the solar panel with two simple runs of Sika 252 and additional placement to secure the end caps. The solar panel can expand and flex comfortably.